Blog:
如何在嵌入式 Linux 系统中使用 GSM/3G/4G 模块
联网的嵌入式设备的数量与日俱增。在很多应用案例中,这些设备会被安装到没有有线或者无线网络的环境。在这种情况下,为了保持设备在线的一个好方法是采用移动无线网络。因此,在这篇博文中将会介绍如何配置运行 Linux 系统的设备,采用 PPP (Point-to-Point Protocol) 协议连接网络。

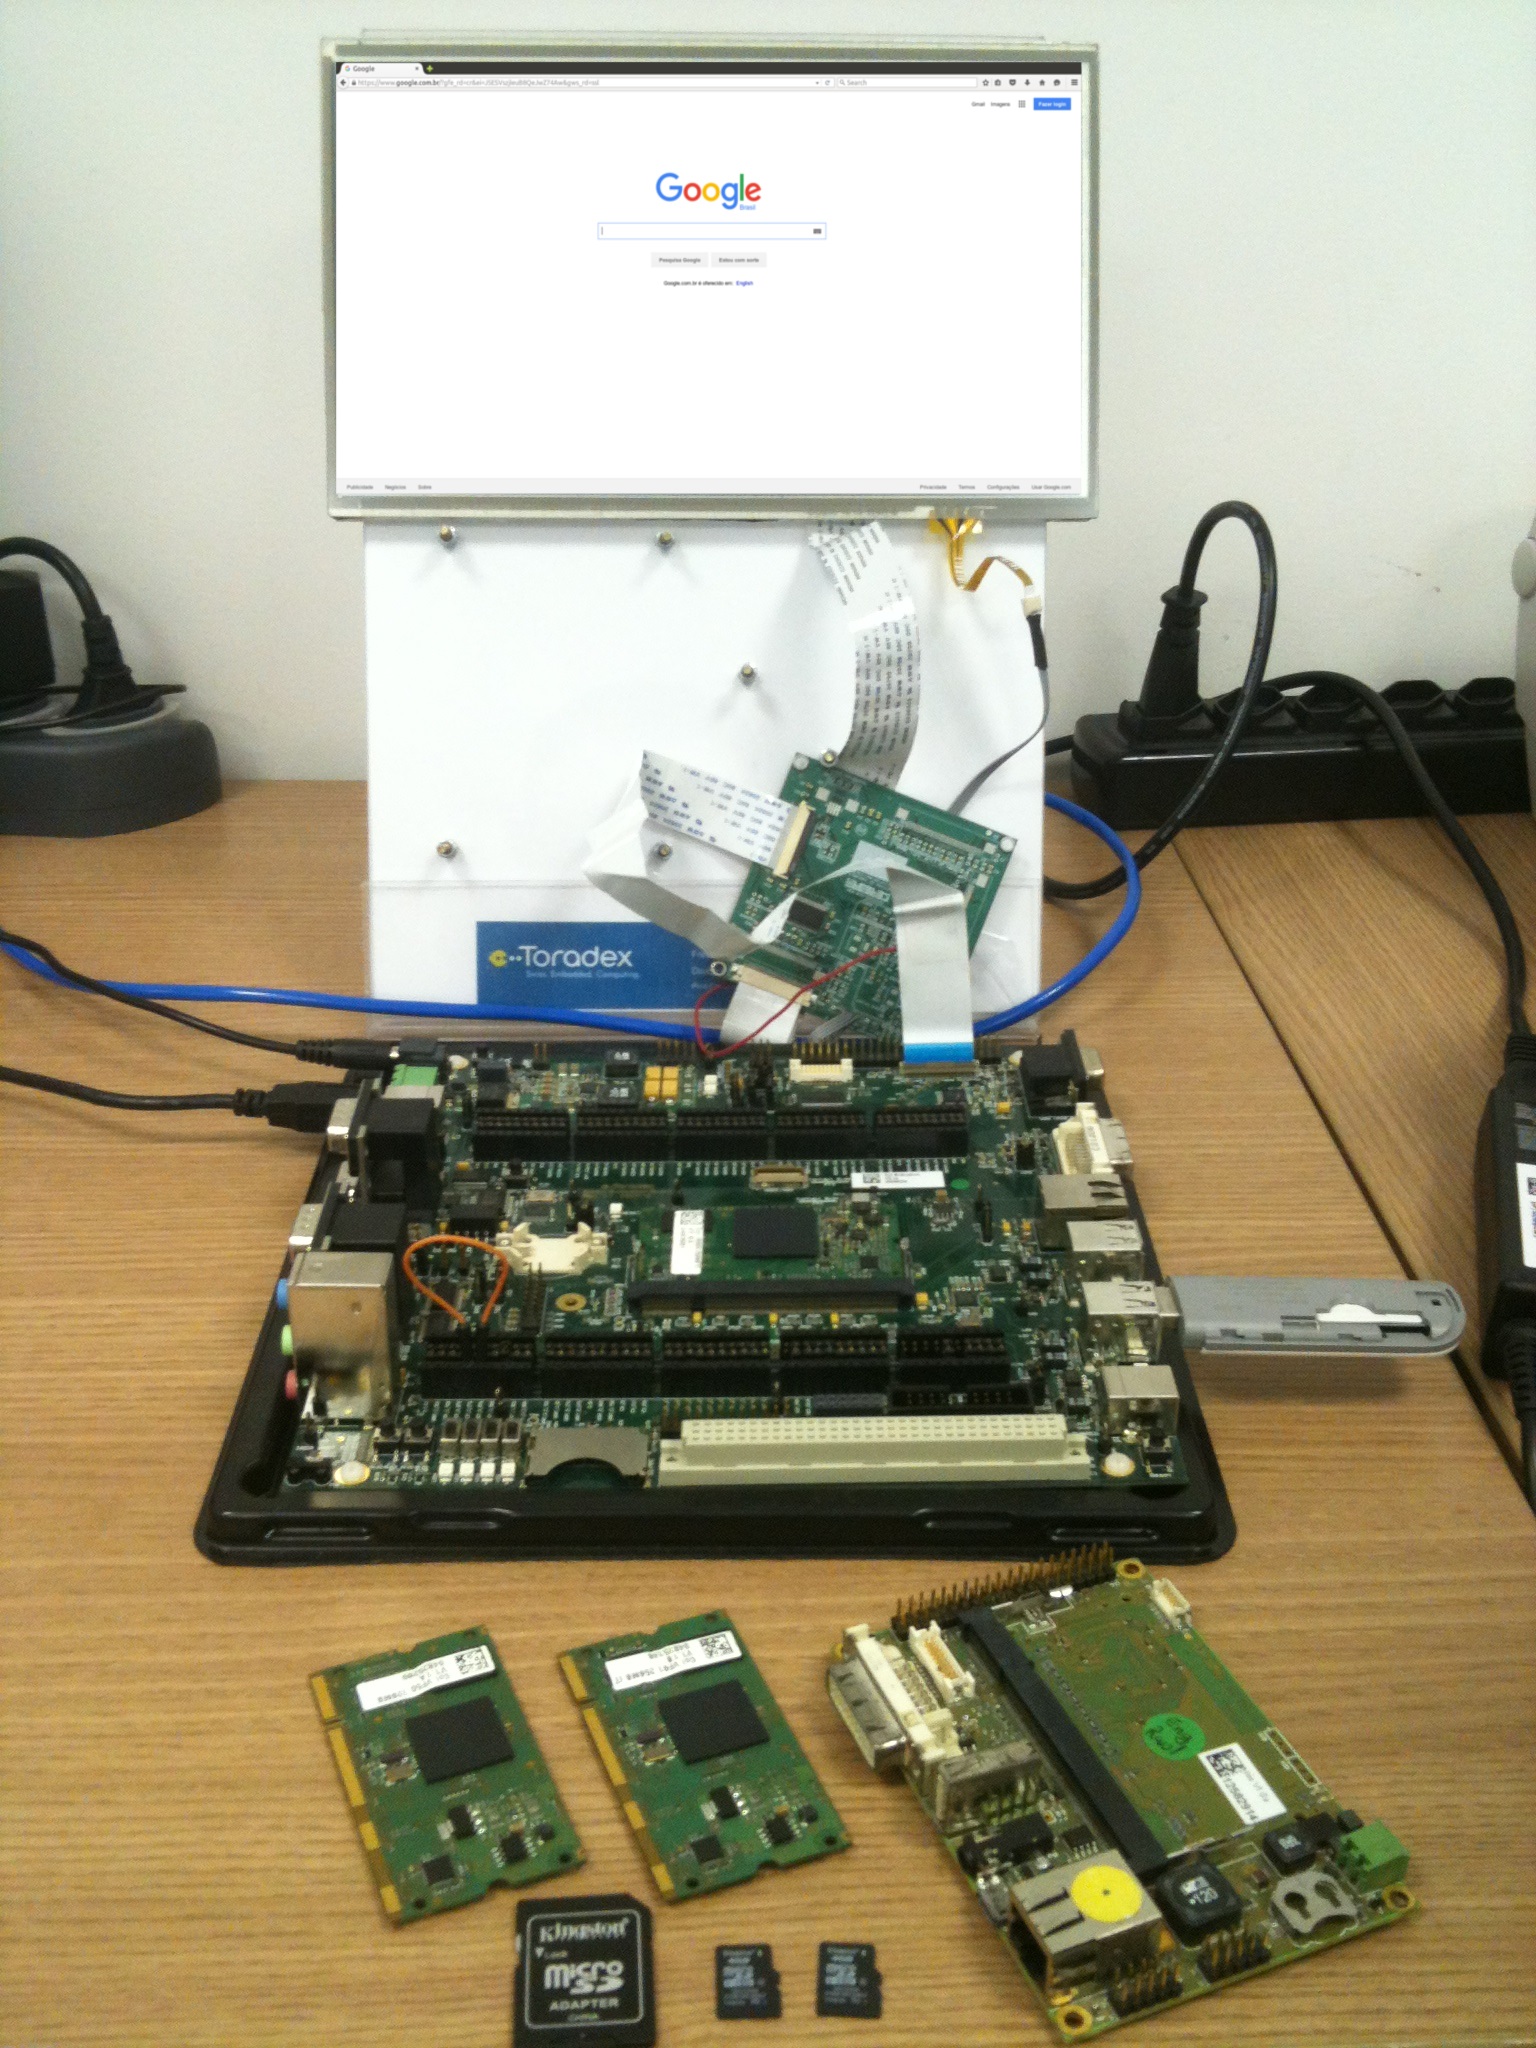
在这篇文中我们将会使用 Toradex 的 Colibri iMX6S 以及配套的底板 “Colibri Evaluation Board”,其非常适合于项目评估和开发。该底板具有大量的外设接口,如 USB、Ethernet、I2C、SPI、RS242、RS485、CAN 等。在板上我们同样也能找到一些多媒体接口,如 HDMI、LVD、VGA 和 LCD。
根据下面的步骤,你可以使用任何 USB 或者串口调制解调器连接网络。你只需要使用在 “/dev/” 目录下的接口,查看你的调制解调器所支持的 AT 指令集,因为每个调制解调器都有特定的 AT 指令。在这里,我们将会使用 Huawei E173s 3G 模块以及开通数据访问的 SIM。
为了在 3G USB 模块上使用 PPP 协议,需要重新配置内核的功能,然后再重新编译。为了了解如何编译内核,我建议参考下面的链接。
http://developer.toradex.com/software-resources/arm-family/linux/board-support-package/build-u-boot-and-linux-kernel-from-source-code
编译内核的步骤大致可以按照如下总结:
- 工具链配置
- 下载正确的内核
- 配置标准处理器功能
- 针对应用更改相应的功能
- 编译
在配置内核的时候,确保在 menuconfig 中启用下面的功能:
CONFIG_PPP:
PPP (Point to Point Protocol) is a newer and better SLIP.  It serves the same purpose: sending Internet traffic over telephone (and other serial) lines.  Ask your access provider if they support it, because otherwise you can't use it; most Internet access providers these days support PPP rather than SLIP.
Device Drivers  --->
   [*] Network device support  --->
          PPP (point-to-point protocol) support
            PPP BSD-Compress compression
             PPP Deflate compression
       [*]     PPP filtering
            PPP MPPE compression (encryption)
       [*]     PPP multilink support
            PPP over Ethernet
            PPP support for async serial ports
            PPP support for sync tty ports

CONFIG_USB_ACM:
This driver supports USB modems and ISDN adapters which support the
Communication Device Class Abstract Control Model interface.
Please read <file:Documentation/usb/acm.txt> for details.
Device Drivers  --->
    [*] USB support  --->
            USB Modem (CDC ACM) support
为了配置和将 3G 模块连接到网络,Linux 除了使用内核驱动,还需要管理连接的软件。这个软件就是 PPP。Toradex 的镜像默认已经安装了PPP。
如果你尚未安装 PPP,请将下面的内容添加至基于 Yocto/OpenEmbedded 编译环境的 local.conf:
IMAGE_INSTALL_append = " ppp"
在安装完所需的软件和驱动后,检查 3G 模块是否被识别。模块的接口会出现在 /dev。基本上驱动将 USB 连接模拟成多个串口连接。
执行下面命令搜索接口 /dev/ttyUSB
$ ls -l /dev/ttyUSB*
一旦出现 ttyUSB0, ttyUSB1 … ttyUSB2,那么调制解调器成功被系统识别。
如果你需要做进一步的测试,可以使用类似 minicom 的终端工具和调制解调器进行通信,检查其是否正常工作。我的调制解调器串口波特率为 115200。
$ minicom -D /dev/ttyACM0
___________________________
AT
OK
在验证完调制解调器通信后,现在可以创建配置文件连接网络。
你可以在 /etc 目录下发现 ppp 目录。在这个里面需要创建一些文件。
首先我们创建 PPP 选项文件:
$ vi /etc/ppp/options
_____________________________________
auth
crtscts
lock
hide-password
modem
mru 296
mtu 296
lcp-echo-interval 30
lcp-echo-failure 4
noipx
persist
asyncmap 0xa0000
mru 1500
refuse-chap
ipcp-max-failure 30
logfile /home/root/ppp
在我的例子中使用 PAP 认证(根据网络运行商的不同,该方式可能发生变化)。
$ vi /etc/ppp/pap-secrets
_____________________________________
#    *      password
vivo vivo vivo
接下来在 /etc/ppp/peer 中创建其他文件。这个文件针对网络运营商提供配置以及指令文件的路径:
$ vi /etc/ppp/peers/vivo-3g.provider
_____________________________________
hide-password
noauth
debug
defaultroute
noipdefault
user vivo
remotename vivo
ipparam vivo
persist
usepeerdns
/dev/ttyUSB0 115200 crtscts
replacedefaultroute
connect 'chat -v -f /etc/ppp/chat/vivo-3g.chat'
现在我们创建向模块发送 AT 指令的文件,使其能够连接网络。这个根据调制解调器模块和产品不同而有所变化。
$ vi /etc/ppp/chat/vivo-3g.chat
_____________________________________
ECHO
ON
ABORT
'BUSY'
ABORT
'NO CARRIER'
ABORT
'ERROR'
""
ATZ OK
\d\dAT+CGDCONT=1,"IP","zap.vivo.com.br" OK
\d\d\dATDT*99# CONNECT
下一步我们会运行 ppp,分析日志文件。通过日志文件,我们可以发现每个 AT 指令运行时间。
$ pon vivo-3g.provider
运行 ppp 后,打开日志文件:
$ tail -f "/home/root/ppp"
在我的实验里,得到下面的日志:
tail -f ppp.log
Sent 3940 bytes, received 2843 bytes.
restoring old default route to eth0 [192.168.10.1]
restore default route ioctl(SIOCADDRT): Network is unreachable(101)
Script /etc/ppp/ip-down started (pid 778)
sent [LCP TermReq id=0x2 "User request"]
rcvd [LCP TermAck id=0x2]
Connection terminated.
Script /etc/ppp/ip-down finished (pid 778), status = 0x0
ATZ
OK
AT+CGDCONT=1,"IP","zap.vivo.com.br"
OK
ATDT*99#
CONNECT
Script chat -v -f /etc/ppp/chat/vivo-3g.chat finished (pid 795), status = 0x0
Serial connection established.
using channel 2
Using interface ppp0
Connect: ppp0  /dev/ttyACM0
rcvd [LCP ConfReq id=0x1     ]
sent [LCP ConfReq id=0x1    ]
sent [LCP ConfAck id=0x1     ]
rcvd [LCP ConfAck id=0x1    ]
sent [LCP EchoReq id=0x0 magic=0xa068db01]
sent [PAP AuthReq id=0x1 user="vivo" password=]
rcvd [LCP EchoRep id=0x0 magic=0x96baf40f]
rcvd [PAP AuthAck id=0x1 ""]
PAP authentication succeeded
sent [CCP ConfReq id=0x1   ]
sent [IPCP ConfReq id=0x1    ]
rcvd [LCP ProtRej id=0x2 80 fd 01 01 00 0f 1a 04 78 00 18 04 78 00 15]
Protocol-Reject for 'Compression Control Protocol' (0x80fd) received
rcvd [IPCP ConfNak id=0x1  ]
sent [IPCP ConfReq id=0x2    ]
rcvd [IPCP ConfNak id=0x2  ]
sent [IPCP ConfReq id=0x3    ]
rcvd [IPCP ConfNak id=0x3  ]
sent [IPCP ConfReq id=0x4    ]
rcvd [IPCP ConfNak id=0x4  ]
sent [IPCP ConfReq id=0x5    ]
rcvd [IPCP ConfNak id=0x5  ]
sent [IPCP ConfReq id=0x6    ]
rcvd [IPCP ConfReq id=0x1]
sent [IPCP ConfNak id=0x1 ]
rcvd [IPCP ConfRej id=0x6 ]
sent [IPCP ConfReq id=0x7   ]
rcvd [IPCP ConfReq id=0x2 ]
sent [IPCP ConfAck id=0x2 ]
rcvd [IPCP ConfNak id=0x7   ]
sent [IPCP ConfReq id=0x8   ]
rcvd [IPCP ConfAck id=0x8   ]
local  IP address 179.133.47.109
remote IP address 179.133.47.109
primary   DNS address 187.100.246.254
secondary DNS address 187.100.246.251
Script /etc/ppp/ip-up started (pid 805)
Script /etc/ppp/ip-up finished (pid 805), status = 0x0
正如日志文件显示的,通信指令逐一执行,最终得下以下输出:
ATDT*99#
CONNECT
你可以使用串口工具验证所需的指令,从而连接网络。一旦通过,你就可以创建自己的指令脚本。
在获得网络运营商分配的 IP 地址后,可以看到 ppp0 接口已经激活:
root@apalis-imx6:/etc/ppp# ifconfig
eth0      Link encap:Ethernet  HWaddr 00:14:2D:C0:00:4C
          UP BROADCAST MULTICAST  MTU:1500  Metric:1
          RX packets:1181 errors:0 dropped:0 overruns:0 frame:0
          TX packets:1223 errors:0 dropped:0 overruns:0 carrier:0
          collisions:0 txqueuelen:1000
         RX bytes:107025 (104.5 KiB)  TX bytes:149841 (146.3 KiB)

lo        Link encap:Local Loopback
          inet addr:127.0.0.1  Mask:255.0.0.0
          inet6 addr: ::1/128 Scope:Host
          UP LOOPBACK RUNNING  MTU:65536  Metric:1
          RX packets:22 errors:0 dropped:0 overruns:0 frame:0
          TX packets:22 errors:0 dropped:0 overruns:0 carrier:0
          collisions:0 txqueuelen:0
         RX bytes:1536 (1.5 KiB)  TX bytes:1536 (1.5 KiB)

ppp0      Link encap:Point-to-Point Protocol
          inet addr:179.133.47.109  P-t-P:179.133.47.109  Mask:255.255.255.255
          UP POINTOPOINT RUNNING NOARP MULTICAST  MTU:296  Metric:1
          RX packets:13 errors:0 dropped:0 overruns:0 frame:0
          TX packets:35 errors:0 dropped:0 overruns:0 carrier:0
          collisions:0 txqueuelen:3
         RX bytes:1330 (1.2 KiB)  TX bytes:2131 (2.0 KiB)
为了测试是否成功建立连接,可以 ping 外部 IP 地址:
root@apalis-imx6:/etc/ppp# ping 8.8.8.8
PING 8.8.8.8 (8.8.8.8): 56 data bytes
64 bytes from 8.8.8.8: seq=0 ttl=45 time=182.304 ms
64 bytes from 8.8.8.8: seq=1 ttl=45 time=34164.126 ms
64 bytes from 8.8.8.8: seq=2 ttl=45 time=33164.085 ms
我们可以使用下面的命令配置 DNS,然后 ping 一个 URL,例如:
$ echo nameserver 8.8.8.8 > /etc/resolv.conf
$ ping google.com

下面的命令可以防止系统重启后修改配置:
$ chattr +i /etc/resolv.conf
现在可以使用 SSH 连接外部的电脑:
$ ssh root@179.133.47.109
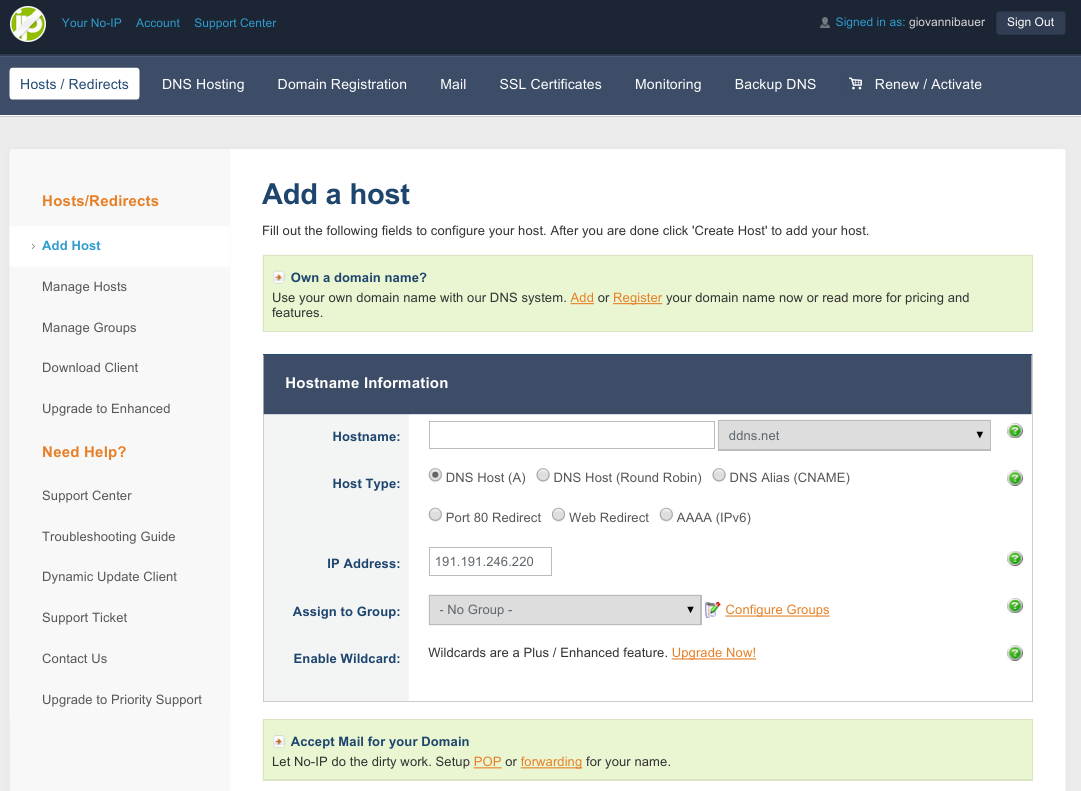
另外我们可以做的是将 IP 地址绑定主机名。为此,我们将使用 NoIP 服务 (www.noip.com)。我们创建一个免费的账号,并添加主机。这里我们使用 toradex.noip.me。

在创建主机名后,我们可以使用 SSH 再次连接:
$ ssh root@toradex.noip.me
在我们的实验里,每次 3G 模块重启后,都将会获取到新的 IP 地址。如果我们尝试重新连接模块,都将会失败。解决的方法是使用 Dynamic DNS(Dynamic Domain Name System)。NoIP 同样提供 DDNS 服务。在 这里可以看到详细的使用信息。大致上我们以 HTTP 请求的方式向 NoIP 发送诸如 IP、主机名、用户名和密码等信息。
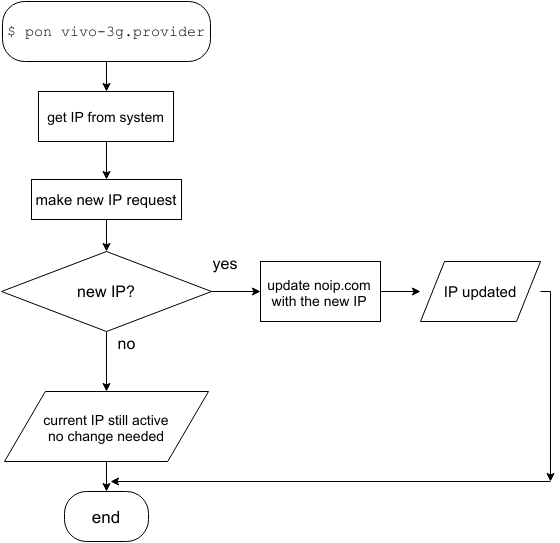
我们编写了一个 Python 程序来完成该请求。在启动 3G 连接时该程序会按按照下面的顺序运行:

#!/usr/bin/python

import sys
import requests
import netifaces as ni

user = 'xxxxxxx'
pswd = 'xxxxxxx'

ni.ifaddresses('ppp0')
ip = ni.ifaddresses('ppp0')[2][0]['addr']
myhostname = 'toradex.noip.me'

payload = {'hostname' : myhostname , 'myip' : ip}
r = requests.get("http://dynupdate.no-ip.com/nic/update", params=payload, auth=(user,pswd))

print " "
if "good" in r.text:
print "Hello", user, "!"
print "Your IP was successfully updated to:", ip
print myhostname, "is up and running!"
if "nochg" in r.text:
print "Hello", user, "!"
print "Your IP", ip, "is still active, no change needed"
if "nohost" in r.text:
print "The given Host name", myhostname, "does not exist under specified account"
print "Please review your Host name and try again"
if "badauth" in r.text:
print "Login and/or Username incorrect"
print "Please correct your credentials and try again"
if "911" in r.text:
print "Sorry for the incovenience but we are experiencing some problems right now"
print "Please try again later"
print "noip.com says:", r.text
print " "
在编写完 Python 程序后,使用 chmod +x 修改权限。将其移至 /etc/ppp/ip-up.d/,当启动 ppp 连接后,这里的脚本可以自动运行,或者也可以创建小的脚本调用 Python 程序。
在 /etc/ppp/ 中由我们在文章一开始创建的文件,以及 ip-down, ip-up, ppp_on_boot 等其他文件。你完全可以测试这些文件。
ip-up 会调用 ip-up.d 中的另外一个脚本或者程序。
这里我们在 ip-up.d中创建一个脚本
#!/bin/bash
python /home/root/noipReq.py > /home/root/noipLog.log
注意:脚本不用 .sh 结尾
Python 程序所有打印信息都可以记录在日志文件中:
root@colibri-imx6:~# cat noipLog.log
Hello giovannibauer !
Your IP was successfully updated to: 179.92.172.193
toradex.noip.me is up and running!
noip.com says: good 179.92.172.193
如果所有的配置都正确,当我们从网络运营商获取新的 IP 地址后,系统都能够自动在 NoIP 更新我们创建的主机。因此,即使 IP 地址发生变化,仍然能够连接至模块。
除了文章所提供的信息,还可以实现其他的网络功能。其中可以通过以太网络共享 3G 模块的网络。我们用两台设备配置一个基本的局域网,并运行下面命令:
iptables -t nat -A POSTROUTING -o ppp0 -j MASQUERADE
除了共享网络,也可以实现端口转发和其他网络功能。
正如在文中看到的, Linux 提供许多网络功能。我们只需要正确配置就可以访问 ppp0 网络。另外一个要点是,无论所使用的接口,编程的方法还是一样。选用哪一个接口,是由 Linux 根据路由自动选择。对于需要网络连接以及系统灵活性的项目,可以选择嵌入式 Linux 系统。
- http://metodiew.com/huawei-e173s-and-ubuntu/
- http://developer.toradex.com/products/colibri-imx6
- http://developer.toradex.com/products/colibri-evaluation-board
本博文最初使用葡萄牙语在 Embarcados.com 发表,点击这里查看。
Justin Tom - 7 years 6 months | Reply
I like this article alot as it provided the essential points in setting up a 3g/4g modem beacuse generally people will mess it up or look for a tutorial up on youtube never to give a thought what they were doing wrong.
Justin Tom - 7 years 7 months | Reply
its a very helpful article, thanks for sharing it.
Regards:
Justin Tom
3G Serial Modems
http://www.intercel.com.au/
Thin - 7 years | Reply
Thanks for sharing it.I used SIM800. My module ran.
I have a question: how do i make a call or sms?
I want to use internet and call together.
Thanks
Toradex - 6 years 11 months | Reply
Hello Thin,
Each module has its own configuration. As far as I remember from the modules I worked on in the past, if you use UART modules, you can just use internet or call/sms.
For the USB modules, I remember it emulates more than one UART channel (ttyACM0,1,2...). In that case, it was possible to use one UART to the ppp and the other to send some AT commands. Using the correct AT Commands you can accept calls, receive, and send SMS.
Again, it really depends more on what GSM module you are using.
If you need more help, please feel free to contact us: support.arm@toradex.com
Thank you,
Raul
Lakshmi Naidu - 6 years 11 months | Reply
Hello Thin,
Each module has its own configuration. As far as I remember from the modules I worked on in the past, if you use UART modules, you can just use internet or call/sms.
For the USB modules, I remember it emulates more than one UART channel (ttyACM0,1,2...). In that case, it was possible to use one UART to the ppp and the other to send some AT commands. Using the correct AT Commands you can accept calls, receive, and send SMS.
Again, it really depends more on what GSM module you are using.
If you need more help, please feel free to contact us: support.arm@toradex.com
Thank you,
Raul